TIP: Making up for ImageJ’s shortcomings
While being a generally poerful and useful framework, ImageJ has some quirks that require workarounds.
To save you running into these at a later stage, here are two common workflows:
undo don’t undo
ImageJ’s undo functionality is a little unreliable - some operations undo and others don’t! To work-around this, use duplicates of images (
ctrl-shift-D) to keep regular, snapshots of your processing work.Regions of Interest
Similarly to the undo, the ROI functionality is a little inconsistent - some functions will operate only inside an ROI while others will still operate on the whole image.
A simple work-around is to use the ROI to crop out your region of interest.
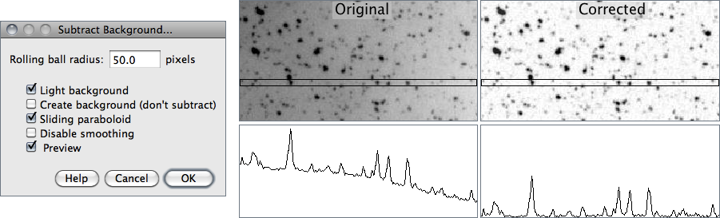
Often data will contain a bright (and sometimes variable) background. ImageJ implements a “rolling ball” filter to subtract this background;
Process > Subtract Background
The choice of ball radius should be larger than the maximum object radius that isn’t background. The action of the filter can be likened to rolling a sphere of given radius “under” the image data - the background that is subtracted is the top-most reach of the sphere.
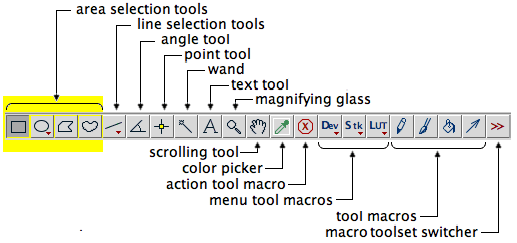
Simple ROIs can be created by using the first few (left-most) icons on the standard ImageJ toolbar, namely the area selection tools,
Once created, an ROI can be used to restrict the region over which subsequent processing and analysis are applied.
Complicated composite ROIs can also be generated and saved by using the ROI manager which can be accessed via
Edit > Selection > Add to Manager [Ctrl + t]
Open the modified cell colony images available from
and select your choice of rectangular region of the image. Apply the background subtraction function to the region - you will find that this is not the default mode of operation for subtract background - try and figure out how to do this. Experiment with the light background setting and confirm that it produces the result that you would expect.
To save the files:
To processes Cell_Colony1.jpg
File > Open ... (or press Ctrl - o)Image > Crop (or press Ctrl - Shift - X)Process > Subtract BackgroundTo processes Cell_Colony2.jpg
File > Open ... (or press Ctrl - o)Image > Crop (or press Ctrl - Shift - X)Process > Subtract BackgroundThe following images represent sample answers.
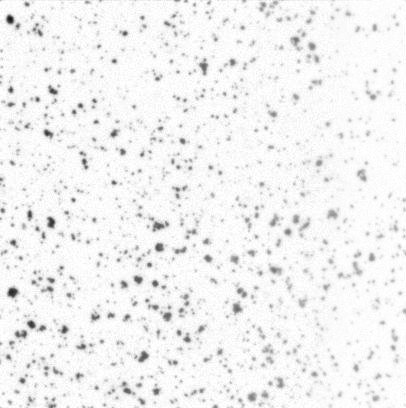
(Using “light background” and radius ~20-40)
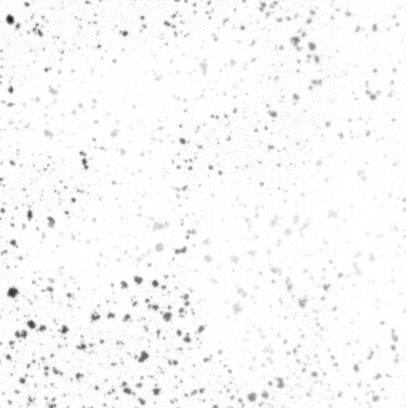
(Using “light background” and radius ~9-11)
Binary masks, which are similar to ROIs, can also be generated by performing segmentation on the image. One of the simplest segmentation operations is thresholding. Simple thresholding marks all pixels with values less than the threshold as off or 0, and all pixels with values equal to or above the threshold as on or 1.
To apply a simple threshold to the image use
Image > Adjust > Threshold [Ctrl + Shift + t]
This opens a thresholding dialog
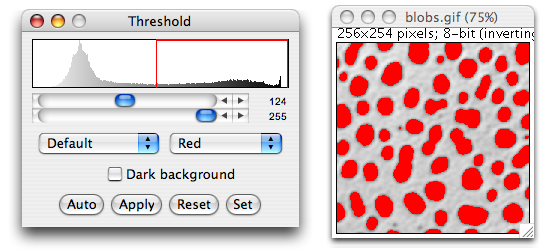
which allows us to see which regions will be included.
Image statistics, as well as advanced statistics and measurements can be accessed via the Analyse menu.
For example, simply running Measure on an open image returns the Area, Mean, Min and Max of the whole image.
Usually ROIs are first generated, either manually, or by using first generating a binary image. This can be achieved by simple thresholding as outlined above or a more advanced technique.
Once the image is binarized, use Measure > Analyze particles to
measure each each binary region.
These can also be turned into individual ROIs by selecting “Add to manager”, and then later used on, for example, the original image.
Using the Cell_Colony1.jpg file as input, first subtract the background (remember to use the dark on light option!) and then measure particle sizes in a polygonal ROI.
To measure objects in Cell_Colony1.jpg
File > Open ... (or press Ctrl - o)Process > Subtract BackgroundImage > Adjust > Threshold (or press Ctrl - Shift - t)Analyze > Analyze particlesThere are multiple approaches to removing small objects, which may correspond to noise, dust, or other unwanted imaging phenomena in imagej. These include
Process > Noise > DespeckleProcess > Noise > Remove outliersProcess > Binary > OpenThe most basic of these is (morphological) opening which, is defined as the dilation of the erosion of a binary image.
Repeat exercise 1.3 - but this time before measuring the objects, experiment with the three techniques for small object removal to familiarize yourself with the differences between them.
To filter small objects and then measure objects in Cell_Colony1.jpg
File > Open ... (or press Ctrl - o)Process > Subtract BackgroundImage > Adjust > Threshold (or press Ctrl - Shift - t)Process > Noise > Despeckle (or one of the other noise
removal functions listed).Analyze > Measure (or press Ctrl - m)