Introduction I
Introduction
These notes are intended as a light introduction and guide to learning how to program in Python.
As big a part of this workshop as any of the formal aims listed below, is that you should enjoy yourself. Python is a fun language because it is relatively easy to read and tells you all about what you did wrong (or what module was broken) if an error occurs.
With that in mind, have fun, and happy learning!
Structure of this course
The main components of this workshop are these notes and accompanying exercises.
In addition you will receive a brief introductory talk, and we will work through the first exercise together to make sure that you are able to write and run a basic Python script.
From there, you’ll be left to work through the material at your own pace with valuable guidance and advice available from the workshop demonstrators - use them!
Where appropriate, key points will be emphasized via short interjections during the workshop.
Workshop Slides
The workshop slides can be accessed here
Introduction II
What is Python?
Python is the name of a programming language (created by Dutch programmer Guido Van Rossum as a hobby programming project!), as well as the program, known as an interpreter, that executes scripts (text files) written in that language.
Van Rossum named his new programming language after Monty Python’s Flying Circus (he was reading the published scripts from “Monty Python’s Flying Circus” at the time of developing Python!).
It is common to use Monty Python references in example code. For example, the dummy (aka metasyntactic) variables often used in Python literature are spam and eggs, instead of the traditional foo and bar. As well as this, the official Python documentation often contains various obscure Monty Python references.
Jargon
The program is known as an interpreter because it interprets human readable code into computer readable code and executes it. This is in contrast to compiled programming languages like C, C++, and Java which split this process up into a compile step (conversion of human-readable code into computer code) and a separate execution step, which is what happens when you press on a typical program executable, or run a Java class file using the Java Virtual Machine.
Because of it’s focus on code readability and highly expressive syntax, meaning that programmers can write less code than would be required with languages like C or Java, Python has grown hugely in popularity and is now one of the most popular programming languages in use.
Added Bonus!
Due to it’s popularity, Python is available for all major computing platforms, including but not limited to:
- Windows
- MacOS - includes a version installed by default
- Linux - includes a version installed by default in many distributions
- Android - via several android apps e.g. QPython, Kivy, Pygame, SL4A.
- Plus Solaris, Windows CE, RISC OS, IOS (IPhone - via apps) and more
Why Python? : Motivation
Now that we know roughly what Python is, why is Python of interest to us as researchers?
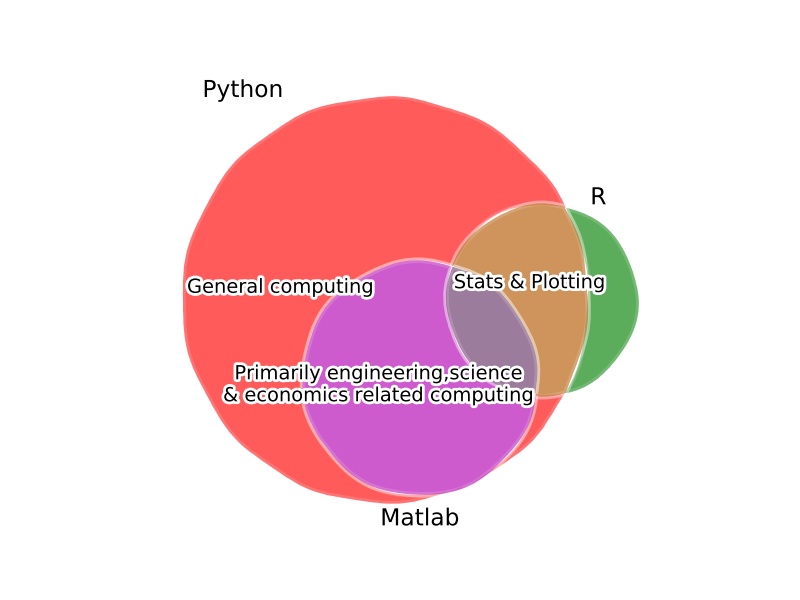
For users of specialist environments like Matlab, Stata, R, the answer might be because in most cases Python offers similar performance and range of functions, while providing a much wider range of additional functionality. Plus compared with Matlab or Stata, Python is open-source and free.
If you come from a low(or lower)-level computing background like C++, Java, Fortran, then Python is great at accelerating development and prototyping time. The ability to “glue” together routines written in Fortan or C++ at the programming level means Python offers the best of both worlds.
Lastly, if you’re not from either of these backgrounds, then let’s provide a sample of what you can do with Python for a typical research project:
- A huge number of libraries means that data readers and writers have been written for a wide range of data formats
- Once data is loaded, numerical analysis libraries allow statistical analysis and modelling to be performed
- The resulting analyses can be turned into plots using Matplotlib or one of a growing number of alternative plotting libraries. These plots can generally be saved as images (PNG, JPG) or PDFs
- The above process is trivial to perform in batch over whole directory trees
- User interface and web application libraries mean that instead of running command line scripts, you can develop rich graphical interfaces for your collaborators, including web-pages
… and why NOT Python?
As much as I think Python is a fantastic programming framework for many tasks, it’s important to pay attention to it’s limitations and possible scenarios when we might not want to use Python.
- Exisiting code-base: if much work has been done in your field using a different language, it often makes more sense to stick with that
- As Python is mostly community supported, documentation and support is not as “well polished” as paid-for products like Matlab and Stata.
- Pure Python* (and Matlab or R) pays for it’s “higher level” syntax by being relatively slow; if speed is of critical importance, you might be best off using e.g. C, C++, or Fortran.
- Newer frameworks: languages like Julia seem to offer high performance while still allowing relatively high-level syntax, and optional typing. While the performance improvement is actually non-existant compared with e.g. Python’s numerical libraries like Numpy, Julia is definitely worth keeping an eye on! That said, for the time being, for my own work I find Julia to be too young - it doesn’t have enough well written libraries or a big enough community yet
* An important note here though is that Python has several mechanism that allow integrating with compiled libraries; in fact most of the numerical computing functionality comes from compiled C-code! Matlab has similar capabilities via “MEX” functions (though to my knowledge the interface is a little more cumbersome). R also has similar interface functionality
Example
With just 13 lines of Python (plus comments), we are able to write a realistic script to loop over all CSV files in a folder (and subfolders), and generate a statistical plot for each one, including titles etc!
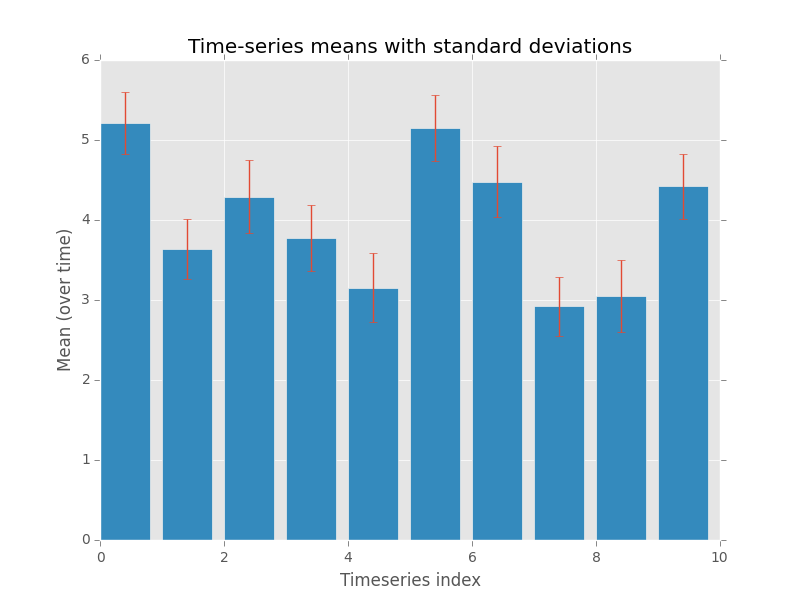
(“Time-series” generated using numpys random number generator).
Plotting sample code
Note: lines starting with a hash (#) are just comments - text useful for other developer and is not executed
In code:
# Modules we're going to use
import os, numpy, pylab
# Matplotlib's default style is a bit ugly, use the R's
# ggplot2-inspired style!
pylab.style.use('ggplot')

# "Walk" through the entire directory tree
for root, dirs, filenames in os.walk("/datapath"):
    # Work on csv (comma separated value) files
    for filename in filter(lambda f: endswith(".csv", filenames)):
        # Load 2d time-series data into an array using Numpy
        # (time is along 2nd dimension)
        data = numpy.loadtxt(filename, delimiter=",")
        # Get some stats
        means   = data.mean(axis=-1)
        stdevs  = data.std(axis=-1)
        stderrs = stdevs / numpy.sqrt(data.shape[-1])

        # Make bar plots with errorbars
        pylab.bar(range(data.shape[0]), means, yerr=stderrs)

        # Add in labels and title
        pylab.xlabel("Timeseries index")
        pylab.ylabel("Mean (over time)")
        pylab.title("Time-series means with standard deviations")

        # Save the plot as a PDF
        # in the data folder with a datafile specific filename
        pylab.savefig(os.path.join(root, filename + "_result.pdf"))
In addition, this was using general numerical libraries; with a specialist library like Pandas this could probably have been reduced further.
While these modules won’t be covered until the advanced sessions, these introductory sessions lay the groundwork for being able to use these modules.
“Real world” Example - Attendee-contributed
Given a task like:
What I would like to do is read an xls file and see if any items in one column are also in a particular column of another xls file.
The real world issue is we get a daily data dump of FRUIT which have GONE BAD and I want to cross reference this against my FRUIT inventory. I can easily turn both into csv files of course. I started to write a script in Python, but have never found the extra 30mins or so I need to finish it.
How can we achieve this, and can we do so with just what we learn in this workshop?
The task turns out to have a simple solution, as well as some more concise approaches if we can use more advanced Python and/or modules.
#
# Simple Python Version
#
print("\n\nSimple Python Version")
# Open data files for reading
fin1 = open("data_sheet1.csv")
fin2 = open("data_sheet2.csv")
# Create empty lists to store contents and overlap
col1 = []
col2 = []
overlap = []
# Read in the files, discarding spaces and removing the comma
for line in fin1:
    col1.append(line.strip().strip(","))
for line in fin2:
    col2.append(line.strip().strip(","))
# Add an item in col2 to the overlap if it is in col1
for cell in col2:
    if cell in col1:
        overlap.append(cell)
# Show what the overlap items are
for cell in overlap:
    print(cell)
# Close the files
fin1.close()
fin2.close()

#
# More advanced Python Version A - order not preserved
#

print('\n\nMore "pythonic" python version -version 1 - order not preserved')
col1 = set(line.split(",")[0] for line in open("data_sheet1.csv"))
col2 = set(line.split(",")[0] for line in open("data_sheet2.csv"))
overlap_2 = col2.intersection(col1)
print("\n".join(overlap_2))

#
# More advanced Python Version B - order preserved
#

print('\n\nMore "pythonic" python version -version 2 - order preserved')
col1 = [line.split(",")[0] for line in open("data_sheet1.csv")]
col2 = [line.split(",")[0] for line in open("data_sheet2.csv")]
overlap_2 = [ cell for cell in col1 if cell in col2 ]
print("\n".join(overlap_2))

#
# Using modules version
#
print("\n\nModules version (using pandas)")
import pandas as pd
df1 = pd.read_csv("data_sheet1.csv", header=-1)
df2 = pd.read_csv("data_sheet2.csv", header=-1)
overlap_3 = pd.merge(df1, df2, how="inner", on=[0])[0]
print(overlap_3)
Given input data sheet 1
Apple,
Banana,
Mango,
Raspberry,
Blueberry,
Passionfruit,
Cherry,
Pear,
and sheet 2:
Mango,
Red Herring,
Cherry,
The whole script then produces the output
Simple Python Version
Mango
Cherry


More "pythonic" python version -version 1 - order not preserved
Cherry
Mango


More "pythonic" python version -version 2 - order preserved
Mango
Cherry


Modules version (using pandas)
0     Mango
1    Cherry
If you would like to run this example, you may download the data sheets from here:
data_sheet1.csv data_sheet2.csv
Aims
This course aims to teach you how to use basic Python including
- Writing scripts
- Python variable types
- Control flow (
if,for,while) - Reading and writing files
- Functions (using and writing!)
- Commenting and documenting code
- Working with modules
We will not be delivering hours of lectures on programming constructs and theory, or detailing how every function of every module works.
Printing the notes
For both environmental reasons and to ensure that you have the most up-to-date version, we recommend that you work from the online version of these notes instead of print-outs. However, while there are no plans to ever take these notes offline, you may wish to save them to PDF (via the print to PDF functionality) to safeguard agaist such an eventuality.
A printable, single page version of these notes is available here.
Errata
Please email any typos, mistakes, broken links or other suggestions to j.metz@exeter.ac.uk.
Installing on your own machine
If you want to use Python on your own computer I would recommend using one of the following “distributions” of Python, rather than just the basic Python interpreter.
Amongst other things, these distributions take the pain out of getting started because they include all of the modules you’re likely to need to get started as well as links to pre-configured consoles that make running Python a breeze.
- Anaconda (Win, MacOS, Linux) : Commercially-backed free distribution
- WinPython (Windows Only) : Open-source free distribution
- Linux : Python 2 is pre-installed on most linux distributions; to install Python 3, simply use your favourite package manager. E.g. on Debian based systems (Debian, Ubuntu, Mint), running
sudo apt-get install python3from a terminal will install Python 3. Alternatively use Anaconda.
Note : Be sure to download the Python 3, not 2, and get the correct architecture for your machine (i.e. 32 or 64 bit).
Getting started
Before we dive into Python, let’s get familiar with the environment we are going to use to program and run Python. The two main components you will need to use Python are
- A terminal/console
- A text editor
*nix Users
If you are continuing on from the UNIX/Linux course and would like to continue to use that, or are using your own Linux machine or MacOS, you should already be familiar with your terminal program and editor.
For the remainder of these notes we will, where needed, show how to use win and *nix (*nix being a common term for “unix-like”).
An editor
As Python code is human readable text, we need a text editor of some sort to read and edit Python code.
Jargon
If the text editor has features like syntax highlighting (colour coding words in the code based on whether ther refer to functions, known keywords, etc), code completion, and other goodies, it’s called a code editor. If it is embedded in an interface that also has a terminal and sometimes a variable browser, the whole program is referred to as an Integrated Development Environment (IDE). Spyder and PyCharm are two such IDEs specific to Python.
For the windows users amongst you, we will be using Notepad++ as this is similar to Notepad but adds things like syntax highlighting.
In the Start Menu, find Notepad++, either by looking through the programs or by using the search field.
*nix users
If you are already comfortable with your editor of choice, keep using that. For the rest of you pluma is the standard text editor included with the MATE desktop environment (gedit on other systems).
The terminal
In order to run Python scripts we will use a pre-configured command prompt provided by WinPython.
In the Start Menu, find WinPython Command Prompt, either by looking through the programs or by using the search field.
To run a script from the terminal use
python scriptname.py
*nix users
Luckliy for you, Linux (and to some extent MacOS) systems make development much more straight-forward!
The ubuntu systems on openstack have had Python installed on them, and all terminals get preconfigured by the installation processes.
On MacOS, you will need to use the Anaconda terminal (or have correctly configured your standard terminal to use Anaconda instead of the built-in Python).
Getting help
As well as asking the demonstrators, you are encouraged to get used to using online resources. Simply searching for e.g.
python FUNCTIONNAME
(and replacing FUNCTIONNAME with the name of the function you want help on!) using your favourite search engine will almost always return relevant help.
While the demonstrators are there to help you get started and provide detailed help when you need it, it will be very beneficial to you in the long run to become familiar with what online sources there are and how to optimize your searches to most quickly find the answers you need.
Resources I often use are:
- Official Python documentation (very extensive!) : https://docs.python.org/3/
- Stack overflow (Programmer Q&A; Python tag) : http://stackoverflow.com/questions/tagged/python
- Various blogs e.g.
- Planet Python : http://planetpython.org/
- Doug Hellmann : https://doughellmann.com/blog/
- Effbot : http://effbot.org/
- Mouse vs Python : http://www.blog.pythonlibrary.org/
Advanced Users
Another simple way of getting help is to use the interactive help system in the IPython console. The IPython console is an interactive Python session, i.e. it looks like a terminal but instead of accepting terminal commands, it accepts Python code directly. The IPython console has several useful features to get help including
help(FUNCTIONNAME)prints help on the function calledFUNCTIONNAMEFUNCTIONNAME?prints help on the function calledFUNCTIONNAMEMODULENAME.and then pressing tab (twice) shows a list of all functions available in the module called MODULENAME (if it’s imported).
Writing your first Script
Organization of scripts
Before we write anything, let’s create a folder to hold your Python scripts.
Usually you would choose a hierarchy that’s sensible for you
(for example I use Documents/programming/python in my home directory
as the root for all of my Python projects!).
For the purposes of this workshop, let’s use your Desktop folder in your U drive and create a folder called
python_workshop
*nix users
Similar to above, but place the
python_workshopfolder in your home folder (e.g./home/ubuntufor openstack users).NB
It’s a slightly confusing convention, but a user’s home folder is the path
/home/username, not simply/home.
What is a Python Script?
A Python script is just a plain text file, and the
convention is to use the extension .py (instead of e.g. .txt)
to let programs know that it holds Python code.
Python code is very close to something called pseudo-code, which is what people use when detailing the main components of an algorithm.
For example, the pseudo-code for the factorial function (e.g. 3! = 3 x 2 x 1) is
SET fact to n
WHILE n is more than 1
    SET fact to fact times (n - 1)
    SET n to n - 1
while the python code is
fact = n
while n > 1:
    fact = fact * (n-1)
    n    = n - 1
What this simple example illustrates, is that Python is extremely readable; it just takes becoming familiar with a few base syntax rules (~grammar).
We’ll be speaking Python in no time!
Worked Exercise : Hello, world!
We’ll start by creating a blank Python script file.
Creating a file
We’re going to name our first script file
exercise_hello_world.py and keep it inside the newly created python_workshop
folder.
To do this, open Notepad++. You should see a blank file (that may be named “new 1”, or “new 2” etc, depending on if you closed any tabs!).
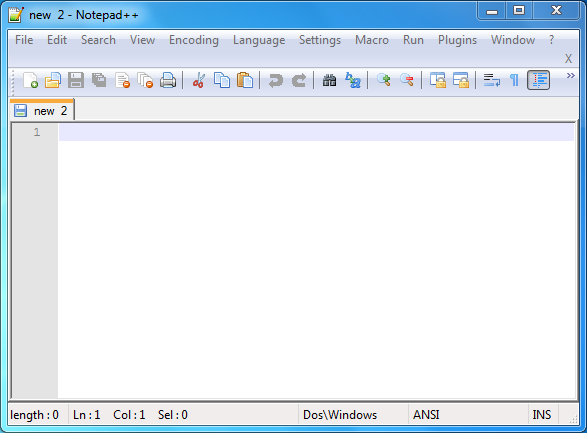
If you don’t see a blank file, select File->New from the menu bar.
Then select File->Save As, navigate to the python_workshop
folder we created a few minutes ago,
and set the file name to exercise_hello_world.py and click Save.
Now that we have a blank Python script file, lets start adding some code!
Initial content
First of all, enter:
    # Author: Your Name <your@email.address>
    # This is a script to test that Python is working
replacing the text in the line starting # Author with your details.
Running the script with Python: The Terminal
Now let’s see what running this through Python does!
Start a customized command prompt (reminder: in the Windows File Explorer, find the WinPython3 folder on the C: drive, and click on WinPython Command Prompt.exe).
A terminal window should pop up, that looks a little bit like
Reminder: Basic terminal usage
You were advised to have basic knowledge of using a terminal (Windows Command Prompt/Linux Terminal/MacOS Terminal), you are about to see out why!
Here’s a recap of the things you’re most likely to need.
Windows MacOS / Linux What it does `cd FOLDER_NAME` `cd FOLDER_NAME` Change directory to FOLDER_NAME `dir FOLDER_NAME` `ls FOLDER_NAME` List folder contents; if FOLDER_NAME
is omitted, list current folder contents`..` `..` Reference to parent folder. E.g. `cd ..`
is how you would navigate from `/a/b/c/` to
`/a/b/` if you are currently in `/a/b/c/`.`mkdir FOLDER_NAME` `mkdir FOLDER_NAME` Create a folder called FOLDER_NAME
Quick note on terminology
Folder and directory refer to the same thing, while full path or absolute path means the full directory location. E.g. if you’re currently in your Desktop folder, the folder is Desktop, but the full path is something like
/users/joe/Desktop. If you’re on Windows the path starts with a drive letter too, like “C:” or “U:”, and the forward-slashes will be backslashes instead.Console and terminal (and sometimes shell) are usually used interchangeably to mean the same thing; the text-based interface where commands can be entered. In windows, the built-in console is also called the “command prompt” and is started using
cmd.exe.For our purposes, we’re going to be mainly interested in the terminal console which is where we type commands like
cd, ordir.For interactive Python snippet testing we can also use the Interactive Python console, which is where we can directly type python commands. You might encounter this later; for now just be aware that there are these two types of console.
Now using the terminal command to change directory, cd, navigate to
your Desktop directory.

You can verify that it contains your new python_workshop folder by
using the windows terminal command dir:
dir
should list
python_workshop
in the output.
Change directory into the python_workshop folder using
cd python_workshop
and verify that our new file is there using dir.
If you see your file (exercise_hello_world.py) listed, great! If not, check the previous steps carefully and/or ask a demonstrator for help.
Once the terminal is in the correct directory, we’re ready to run Python on our file.
As the terminal is preconfigured (meaning that it knows all about the Python program and where to find it) we can simply type python ... to run the Python interpreter, replacing “…” with input arguments.
In most simple use cases, we just use a single input argument; the script file name.
In advanced usage cases, we can also add in additional command line arguments to the script, but this will be covered in an advanced exercise in the follow-on workshop.
We can now type
python exercise_hello_world.py
to get Python to run our script file:
We should get no output - python has interpreted and run our script file, but as the script only contained comments, no terminal output was produced!
Comments
Comments are used to make notes about things like what each few lines of code are doing. In our case, we also added an initial comment that keeps track of who wrote the script. Comments are created by using the hash symbol, #.
A comment can take up a whole line as in our script above, or only part of a line; we’ll see an example of this later.
Adding functionality
Now that we have a script file that contains a couple of lines of comment, and successfully runs with Python (i.e. does nothing!), let’s add some functionality.
Switch back to the editor window (Notepad++) and add an empty line (for readability). Then, on the fourth line of the script add the text
print("Hello world from YOURNAME")
replacing the placeholder YOURNAME with your actual name.
Answer: Hello world
Your code should look like:
# Author: Joe Bloggs <joe@bloggs.com>
# This is a script to test that Python is working

print("Hello World from Joe")
which produces the output:
Hello World from Joe
Switch to the terminal window, and repeat the python command
Tip
On many terminals, you can press the Up arrow key to cycle through previous commands. This will save you from having to type the command each time!
Tip
On several desktop environments (including Windows), you can cycle between open windows using “Alt + Tab” (or “Alt + Shift + Tab) to cycle in the other direction); this saves you from having to use the mouse between editing and running code.

Hurrah! We got Python to output text to the terminal. This may not seem like much of an achievement, but once you understand this line of code, you’re well on your way to being able to program in Python.
So let’s have a look.
Anatomy of our script
Lines 1 & 2
As mentioned above, lines 1 and 2 are comments, which are non-executing lines of text that are used for us to be able to understand our code. They may seem pointless now, but if you give your script to a colleague who’s never touched a program before, if they read the first couple of lines they will immediately know who wrote the script, and why.
Comments become much more useful as scripts grow; “future you” may well benefit from well commented code as you look back over a script and try to remember what you were doing and why!
Line 4
Our first line of Python code contains two of the major concepts of this course; a function call, and data type.
Calling a function
The function being called, or executed, is named print, and
the data it is given as an argument is "Hello, world from Joe".
This data is of type string (more on ths in the next setion!).
What is a Function?
A function is a self-contained piece of processing; often functions take inputs and provide return values (but they don’t have to).
They provide a way to separate specific pieces of processing so that they can be reused over and over again.
If you’re familiar with the concept of a function from mathematics, programming functions can be similar: for example the sin trigonometric function generates an output number (between -1 and 1) for any input angle.
The
The syntax for calling a function is:
- the function name, in this case
print, - followed by open parentheses, (
- the argument list, in this case the string
"Hello, world from Joe", - and then close parentheses, )
Outputting to the terminal using print
The print function is useful for providing output to the terminal - which is
the most basic way of getting information out of a Python script.
The print function accepts a variety of input data types. For example we can write
print("Any string")
as well as
print(3.147)
i.e. a number.
You may also pass multiple, comma-separated arguments to the print function.
E.g.
print(10, "is bigger than", 2)
outputs:
10 is bigger than 2
Now that we know how to write a script, and how to run it with Python, let’s examine in more detail what goes into the script, starting with data types.
VITAL note on whitespace in Python scripts
Guido (the creator of Python) decided that code-readability is crucial for good programming, and that unlike most other languages where badly laid out code is still valid, in Python code must be laid out in a specific way.
By layout, we are refering to the whitespace (spaces or tabs) preceding text in code, known as the indentation:
*We’ll cover in more detail what we mean by “logical blocks” later on, when we look at loops and conditional execution of code.
For example
print("Hello")
print("World")
is perfectly fine, while
print("Hello")
  print("World")
would cause an indentation error.
While this feature of Python may seem petty or just irritating at first, many Python users grow to appreciate its significance in enforcing good coding practice.
Data types
At the end of of the last section, we introduced the
string data-type as being an argument to the print function.
Two of the most basic data types in Python are strings and numbers.
Numerical data
Valid numbers like 10, 0.001, and 1E6 (a million in scientific notation) are all
treated in the same way by Python.
Numbers can be operated on using standard arithmetic like
- Addition + :
40 + 2(= 42) - Subtraction - :
102 - 1(= 101) - Multiplication ** * ** :
2 * 3(= 6) - Division ** / ** :
3/2(=1.5) - Exponentiation ** ** ** :
3**2(=9)
Jargon
Unlike “statically typed” languages like C++ and Java, number data storage in Python is handled automatically and conversions done as needed.
For example
10will be stored internally as anint, but1/10will result in0.1(float) while10+1will result in11(int).
Exercise : Using Python as a calculator
Write a script (name the file exercise_calculator.py)
to output the result of the following operations:
- 1 divided by 2323999
- 2382 multiplied by 121987
- 2 to the power of 256 (exponentiation)
Using Python as a calculator
Use the script from exercise_hello_world as a template.
If you copy and paste the print function line a few times,
you can replace the string with the numerical expressions in the question text.
Answer
You could use something like
print(1/2323999)
print(2382 * 121987)
print(2**256)
Your script should output the numbers:
4.3029278411909814e-07
290573034
115792089237316195423570985008687907853269984665640564039457584007913129639936
Additional operations: comparison operators
In addition to standard algorithmic operators in the previous section, you can perform comparisons on numerical data resulting in Boolean (True/False) results, such as
==Equal :4==5results inFalse>Greater than :2 > 3results inFalse<Less than :2 < 3results inTrue
as well as >= (greater than or equal), <= (less than or equal), and != (not equal).
Booleans:
True&FalseHere we introduced a new data type - the boolean (aka
bool).Boolean data is converted to 0 and 1 when performing any kind of arithmetic, e.g.
True + Falsegives1True/10gives 0.1Booleans can be thought of as being a sub-type of numerical data - where only 0 and 1 are represented.
Strings
The term string is roughly speaking short for a string of characters, i.e. text. String data is enclosed in single or double quotes; the following are all valid Python strings
'I am a string'
"I'm a string too" (A double-quoted string can contain single quotes and vice-versa)
"""
And python accepts multi-line strings enclosed in
triple quotes...(more on me in a while!)
"""
Strings are one of the most basic “sequence” data types; we’ll encounter a few more in the next section.
Accessing individual characters in the String
To access individual characters in a string, we use index notation, which is represented using square brackets, [ ].
For example, to access the second character of a string we can use
"abcdefg"[1]
which gives access to the character “b”. This is because Python uses
zero-indexing meaning that the first element is accessed using [0],
as do most programming languages (a notable exception being Matlab,
which uses 1-indexing, i.e. the first element is 1, not 0).
Accessing a range of characters
If instead of accessing a single character we want to access a range of characters,
for example the first five characters in the string "Hello, world", we
use what is called slice indexing:
"Hello, world"[0:5]
returns "Hello".
The syntax for slice indexing is [START_INDEX : END_INDEX_PLUS_ONE], e.g.
if instead we had wanted the fifth to the eighth characters (inclusive) we would use
"Hello, world"[4:8]
which returns "o, w"
By default, the START_INDEX is 0, and the END_INDEX_PLUS_ONE is the length of the string,
so we could have written
"Hello, world"[0:5]
as
"Hello, world"[:5]
Both return "Hello".
Negative indexing
Lastly, a really handy indexing feature is negative indexing; the last character of a string is accessible using -1, the second last as -2, and so on. Negative indices can also be used as part of a slice, e.g. to access the last 5 characters we can use
"Hello, world"[-5:]
which returns "world".
String operations
There are a range of operations that can be performed with Strings.
These include some translations of the arithmetic operations:
- Concatenation using the plus sign :
"Hello " + "world"(= “Hello world”) - Repetition using multiplication sign : “abc” * 3 (= “abcabcabc”)
as well as functions known as member functions which can be accessed using dot-notation, e.g.
- find: E.g.
"Hello, world".find("wo")(=7, the index at which the string “wo” starts) - replace : E.g.
"Hello, world".replace("w", "W")( results in “Hello, World” - i.e. replaced “w” with “W”) - endswith : E.g.
"Hello, world".endswith("Dog") (results inFalse`, because the string does not end in “Dog”)
The full list of member functions is:
capitalize    endswith      index         isidentifier  istitle       lstrip        rindex        split         title
casefold      expandtabs    isalnum       islower       isupper       maketrans     rjust         splitlines    translate
center        find          isalpha       isnumeric     join          partition     rpartition    startswith    upper
count         format        isdecimal     isprintable   ljust         replace       rsplit        strip         zfill
encode        format_map    isdigit       isspace       lower         rfind         rstrip        swapcase
More details on all of these methods can be found here.
Exercise : Using Python to analyse text
Write a script (name the file exercise_strings.py)
to count the number of occurrences of the character “A”,
and also the number of occurrences of the sequence “AT” in the following
string of text (tip: carefully double-click on the
string to select the whole line, copy, and paste
the string directly into the file).
'CGCCAATGCGGCAAGGATATGCGAAGTCTGGACTAATTCGGCTGACGTGTCCCTGCTTAGTGGTCTTCCACACTTGCGGATTCAGCCGTAAGTGGCGTATACCTCGTGAGTGCACAAGGCAGATGTGACCTACCGGGGTTTTATCATTAGACTTTTGGGGTGAGCCGGATGACCGATCGAAGCCCGAGTGCAATTGTCTCTCTCGAACGAAGAACGGAGGAGAAAACGTGTGTGGGGGCCTACCGCCATGCACAAACTAGACTGTCACTAAAACCGTGAAGCTACGCTGGCCTCCAGGCGGTATAAACCTTTCGATGTTAACAAGCAAAGAACCAATTCGCGTGAGTAGGCGGGCGTATGGCCCCACGAGCCTTGCACTTGTTTTCGAAATGAATCAGGACGCCTAATTATCAGAGGGAGGAGAAATGAGGCCAGCCAGCGACACTGGTCAAGGTACGGGCGGTCGCTAGTGCCCAACCAAAGGTAAGTTATTGCGATGGTCCAAAAGAAGGCACGTGTGGATACACTCGTTTATGAACGTTTCTACGGCAGATCAGGCCGACCTTCGATAATAACAAGCGGCGGGACGCACGACGGGACTCGCTGTCGGTCAGCTATGGCCATTCCTCGTAGGAGCCGCATCTATCTCGAACTAATTGATAGTTTGGTGTAAGTCCCCTCAGGTGTCACGCAACGAAGATGCGCTGAAGATTACTTTCGCACGGGTCACACGGAAGGAGTACTGTAGGGCGGAAGAGCACCGACTGAGGCCACAATCTCGAAGTACTGTGCTTTCGCTCTAACTCGGCTTACCCGTCTACCTGTCGCCTCCCTAGATCCAAATTGAATCCGCCCCCCGTGCTCTGTGACCCAGGACGTATACGGCGTTTAGGTTGTCCACAGCTAAAAACCAGAAAGCGACCGAGTGTATTCGAAATTTCGGTGGACCTTTCAACCTATAGGTCTTGTCGAATTCACTTGGGAGAACAACGCATGAAATTTGACGGATCGTGCACGTGATATAATGGGACTGCTTAATTGCGCCCCATTTTGGGAGCGCATTTGAACGCAAGCTCTGGGTCCCGCTATATATTAAGAAAAGTATGAAACGTTGTTACCATATCCGCACACTGGGATAGGTACGCAGATTTGTACTTGTATGCGTAACTGATTTTTCCCCTGACGGAGGGTCCGTTCCTCTGAGCCCCCGTCGTGCGATCCTGGGTGGCCACGTCTAAGCTGTCGCGAGCGAACATTATTTATGTTTATCTGCCAGACGAGCTTTGCCTACTTTCGAGGGGATGAAATTTAATTAAGCGATTTGAATATAAGGGGGTTTCATATGCCTAGATTACCTAGTGCGTTTATACAACTATGGTGAATAGAGGAGCAGTCCGAGTTAGAGGACAAACACTTTCGCAGGTGGCAAGTCGCACTAGCGAGTTGATTACGGACCACGAGGTATATTCAGGACATCAATTTTCCTGGGGGGATCATCTCCTCTTACTGTAGCAGCTTTTTTCTCTCCCTGCGGATTCAAAGCCCTTGTTCTGTCGCTGCCATTTAAAGGGAAAGGACTCGGAAGAACAGGTTCAGAGATTGGCAAAGACGGTCTTCTGTGCACTTTGATCATTGTGGCTTGAGGCGGGAGACACGAACGGCGCTAGCGACTCTCATCTACCAGCCTATTATATCCGCTCCCCTGGTTGAGTAAATACCTAATAAGGACTTTTGTCAGATTGACTTTCTGCAAGGGCAGGGATGGCATAGGAGATATTCACTAATAGGATGAACGTCGAAGGAGTAAATTGTTTGGAGTAATATTTTAATTCTCCTCCGCATAAAAACGTGCCTGACTAATGCTGACTGGAAATGACGTCATGGGGTGACATCCTGACAAGTATTCGACAGACGCAGAATGGCGACGGCGCACTCAGATTTAGTCCTCTTCTTCCGAGTAAATACTCGTACACCGCAAAGATTGAGGGCATAGGTAAGCGTACAAAATCCGGTGTCATCGACCCAAGTAGAGACTACATGACGGGCCGTGAGGTGATCTGATCTTTGACTCTCCGTAAGGTGTCCCTAGGGGGTTCCCATGGTAACGGATTTGCGCTCAACCCGAAACTCGAACAACATCGAAATGAGTATAACGGTTAGAGGTTAGTGGGGGGTGCGAGTGCGGTGTTCCTACTGTACCCGAAGGATAGTCCTGTTTCATTCATATTGGAGATTACAGCCCCTAGAAGTGAGGGAACACGCCCGAGGCTTTCATGGCTACAGGTCGGGATGTCAGCCCCCTCTAAGGTTGGAAGCAATAGATCACCTATGTTAGATGGCAGCTGATTTCCACCTCCTGCCGAAGGTCCCATTATAGGCATCCCAAGGTGCAGTCGATACCCCAATTGTTCGCCTAGTGGTGGAGTGGCCATCTGTGGGGCATGTCATGAAGAACAGGCCACCTCGGCGACCCAACCTCCACTCAGTCGGTCCGCTGAAGTCTCGGAGCTCTAGTTGACGGAAGGCTTCGGGTTTCTCACCACCTGTCCGTAAGAGACCTGTATTGGTCGCACGCAGGAGGAAGACGGCTTACGATGTGTGGCTAATTCGCGTCCTCATGCCCAGCCATACTATGTTGTGACGCGATGACCTCAGCGGTTAATGCCTCTCCGCCAGTTGGATAGTTCGTTCTGGAAACCTGCAATACATCCTTTCGTGCTTGGCGTCTGATAAGAGTAAGGAACTTATTGAACGTTTACCCATAGCGGGCACTTCAAGTCTGGGCCCGAAGGGAACTCGTGATAGGGGGCGCAATGATATTCTGCTGTCTAAAAGCCACGACAAGGTCTCCACAAGTCAGGACGCCAATCCAACTAAATACTGCCGAAATGCGAGAATTCGTGCCCCCACGCACGTTCTAGGCGAGCGTTGGCGTCAGAAATACGTAAGACTGGTGGACTTTGAACAGGCAACGGGCAGCGACTATCGATAAAGTAAATCCCGCGATAGAAGTTACATCTCTTAGCCTCAGAGACTCATACCGGGCGTATCCGGTACGTCATCGCCATGGACCATTCCGGTAAGTCCATATCATATCGAACAGCCTTTACTACTGGAAACCCATCTTCCAGTACATGTCCGGAAATGGGACAATAGAAAACTGCGGTGCGTGAGCCTACTATAGTGTATCCCGGTATAGATTGGTGCTCAGGCAAAAGAGCTCTACGAGACAACGTCGACAGAGACAGGCGATCGTACGAGCGAGTAGGCATCACCTGCGGTGTTTGGACTATGTGAGGAGCATCAGGTCGTCTCTAAAGTATCGACTCTTCGTATTAGGCATCCACTCAAAATGAACCTTGCCCACGTCTCCTCCATCTCAGAGGATATGTCACGTCTGCCTACCTGAATGCCGACTGATTCGTCTACAACCACTAATACGGACGTAGTCTCCTCAAGAGTTACAGGTTAGATCCTTACCCATAATATCGGACAATCGTATCGGGTGGTGGTTAAGCGTCGGCGAGCTGTGGTTCAGTGCGATAGGGTTAACCCGCGTGTTCAACGCCCGGGCACAAGAAGTGAACTAGGCGTCTCGGTCCCGGAGGGTTGGATCCATTTACCATCGAGTACGAATTATGACTCCCTAAGTAATACCAAAAGGCCTAACCGGGCCAGGGCCCGTATCGCACCGACGCTCTGGGGTCCGCCTAGAGGTTGACCGCACGACAGGCCTCCTCCTATAGGCGGTTCCGCGTCGGACTACTATCGTCTGGTGTAAGACACTAAGCTCGAATCGACCACACGTAGATTATTTACGATCATGGTCGCTAGGGACCAGCTGTACAAGCTCGTAAACTTAACCTAGTCAGTATTTTGGACCTTTCAGGTGTACGCCGGAATTGAATTGTGGGCTTCAGCGAGCGATGTCCTTATTTAGCAATTCACGCACGGCGTACTCATATCGCTATAAGCGTGTCCGACCTAAGTGCGTTGGGCACTCCGTTCCTGAAAATGTTTTTCGCTGAATCTGGTGTAACCTGCGCGGCGGCATCTTATGAACATTAACCCGCGTCCAGGACGTAAGGATTCCGCACCCTAAGGAAACCGGGTCCGCTTATCAGTATCAGCTCATTGGAGGTTGAAACATTGCTTCCATCATGTCAAATGGTGCGGGAGCGTAGGCTCGTTCAAGGATCAAAGCCGCATGGTCGCCTGCTCTCTAGTTTCAAACTGTTAATAGGAAAACCGTGTACTATTAGAGGGTGGAATCCAAAGCCTTGTAGGGCATATAAGAGGGAAATTCTTTTTCCGGTGCTTAACCCAATGACTCCCTCCGGATAGCCTCACTAAATTCTGGCGATACAACTACTCGTTCGGGATTCTATTGCCTTCCGGATGGTTCCCTGTGCCTATAAGTTCGTTAACGGTGTACCTCGAACAGAATAAAAGTCCACCATGGAAATGGGATTCTCGGAGTGCTCCAGAATGATCTGTTAGCAGCTACGCCGCTGGTACTTCGTAATCCATTAAAGCGGTTTAGACTGCCAACTCCTCCGTGCGCAACAGATAGCCTCAACAATTTACGCCATCTGAGCGGACAGCATTTGATAAGGAATGTACATCACCGGGACTCCTTTTGTGGGAGTGCGGCACGGACGCGTTATGCCGAGTTCTCTAGCTACCCTGGCTAGAGAACCTAGGAGTGCACGTTCGTTTTGAACCCTAAACGTCCGATGCGACCCTTGAGTCGCAAACTGTGTAACATGCCGGCGGTGGGTAAAGTTATCTCTGGGATAGGTCTGAGCTCGCGAAAAAAGTCGCATCCGGGCATGGCTTGCCCAACTGTGGACCATTGCACAATAGCGAAACAGGCATGCGTTAAGTCACACCACAGACCTTGGAATTAGGGCGATGGCGTACCACACCTTATCGTGGAGCCCACCAAGAGAGCAAAAGTCATTAACGATCAATTTTGTAACAGATCTAATTGGATGGAG'
Strings Exercise
After copying and pasting the string into your script file (make sure to also include the quote at the start and end of the string!), find out which member functions will count (hint hint!) the occurrences of a sub-string in a string.
You’ll need to copy and paste the string twice (once for each counting operation).
Don’t forget to enclose the whole string plus function call in a print statement in order to get output.
Answer
Your code should look something like
# Call the count member function on a long (sequence like) string

print("CGCCAATGCGGCAAGGATATGCGAAGTCTGGACTAATTCGGCTGACGTGTCCCTGCTTAGTGGTCTTCCACACTTGCGGATTCAGCCGTAAGTGGCGTATACCTCGTGAGTGCACAAGGCAGATGTGACCTACCGGGGTTTTATCATTAGACTTTTGGGGTGAGCCGGATGACCGATCGAAGCCCGAGTGCAATTGTCTCTCTCGAACGAAGAACGGAGGAGAAAACGTGTGTGGGGGCCTACCGCCATGCACAAACTAGACTGTCACTAAAACCGTGAAGCTACGCTGGCCTCCAGGCGGTATAAACCTTTCGATGTTAACAAGCAAAGAACCAATTCGCGTGAGTAGGCGGGCGTATGGCCCCACGAGCCTTGCACTTGTTTTCGAAATGAATCAGGACGCCTAATTATCAGAGGGAGGAGAAATGAGGCCAGCCAGCGACACTGGTCAAGGTACGGGCGGTCGCTAGTGCCCAACCAAAGGTAAGTTATTGCGATGGTCCAAAAGAAGGCACGTGTGGATACACTCGTTTATGAACGTTTCTACGGCAGATCAGGCCGACCTTCGATAATAACAAGCGGCGGGACGCACGACGGGACTCGCTGTCGGTCAGCTATGGCCATTCCTCGTAGGAGCCGCATCTATCTCGAACTAATTGATAGTTTGGTGTAAGTCCCCTCAGGTGTCACGCAACGAAGATGCGCTGAAGATTACTTTCGCACGGGTCACACGGAAGGAGTACTGTAGGGCGGAAGAGCACCGACTGAGGCCACAATCTCGAAGTACTGTGCTTTCGCTCTAACTCGGCTTACCCGTCTACCTGTCGCCTCCCTAGATCCAAATTGAATCCGCCCCCCGTGCTCTGTGACCCAGGACGTATACGGCGTTTAGGTTGTCCACAGCTAAAAACCAGAAAGCGACCGAGTGTATTCGAAATTTCGGTGGACCTTTCAACCTATAGGTCTTGTCGAATTCACTTGGGAGAACAACGCATGAAATTTGACGGATCGTGCACGTGATATAATGGGACTGCTTAATTGCGCCCCATTTTGGGAGCGCATTTGAACGCAAGCTCTGGGTCCCGCTATATATTAAGAAAAGTATGAAACGTTGTTACCATATCCGCACACTGGGATAGGTACGCAGATTTGTACTTGTATGCGTAACTGATTTTTCCCCTGACGGAGGGTCCGTTCCTCTGAGCCCCCGTCGTGCGATCCTGGGTGGCCACGTCTAAGCTGTCGCGAGCGAACATTATTTATGTTTATCTGCCAGACGAGCTTTGCCTACTTTCGAGGGGATGAAATTTAATTAAGCGATTTGAATATAAGGGGGTTTCATATGCCTAGATTACCTAGTGCGTTTATACAACTATGGTGAATAGAGGAGCAGTCCGAGTTAGAGGACAAACACTTTCGCAGGTGGCAAGTCGCACTAGCGAGTTGATTACGGACCACGAGGTATATTCAGGACATCAATTTTCCTGGGGGGATCATCTCCTCTTACTGTAGCAGCTTTTTTCTCTCCCTGCGGATTCAAAGCCCTTGTTCTGTCGCTGCCATTTAAAGGGAAAGGACTCGGAAGAACAGGTTCAGAGATTGGCAAAGACGGTCTTCTGTGCACTTTGATCATTGTGGCTTGAGGCGGGAGACACGAACGGCGCTAGCGACTCTCATCTACCAGCCTATTATATCCGCTCCCCTGGTTGAGTAAATACCTAATAAGGACTTTTGTCAGATTGACTTTCTGCAAGGGCAGGGATGGCATAGGAGATATTCACTAATAGGATGAACGTCGAAGGAGTAAATTGTTTGGAGTAATATTTTAATTCTCCTCCGCATAAAAACGTGCCTGACTAATGCTGACTGGAAATGACGTCATGGGGTGACATCCTGACAAGTATTCGACAGACGCAGAATGGCGACGGCGCACTCAGATTTAGTCCTCTTCTTCCGAGTAAATACTCGTACACCGCAAAGATTGAGGGCATAGGTAAGCGTACAAAATCCGGTGTCATCGACCCAAGTAGAGACTACATGACGGGCCGTGAGGTGATCTGATCTTTGACTCTCCGTAAGGTGTCCCTAGGGGGTTCCCATGGTAACGGATTTGCGCTCAACCCGAAACTCGAACAACATCGAAATGAGTATAACGGTTAGAGGTTAGTGGGGGGTGCGAGTGCGGTGTTCCTACTGTACCCGAAGGATAGTCCTGTTTCATTCATATTGGAGATTACAGCCCCTAGAAGTGAGGGAACACGCCCGAGGCTTTCATGGCTACAGGTCGGGATGTCAGCCCCCTCTAAGGTTGGAAGCAATAGATCACCTATGTTAGATGGCAGCTGATTTCCACCTCCTGCCGAAGGTCCCATTATAGGCATCCCAAGGTGCAGTCGATACCCCAATTGTTCGCCTAGTGGTGGAGTGGCCATCTGTGGGGCATGTCATGAAGAACAGGCCACCTCGGCGACCCAACCTCCACTCAGTCGGTCCGCTGAAGTCTCGGAGCTCTAGTTGACGGAAGGCTTCGGGTTTCTCACCACCTGTCCGTAAGAGACCTGTATTGGTCGCACGCAGGAGGAAGACGGCTTACGATGTGTGGCTAATTCGCGTCCTCATGCCCAGCCATACTATGTTGTGACGCGATGACCTCAGCGGTTAATGCCTCTCCGCCAGTTGGATAGTTCGTTCTGGAAACCTGCAATACATCCTTTCGTGCTTGGCGTCTGATAAGAGTAAGGAACTTATTGAACGTTTACCCATAGCGGGCACTTCAAGTCTGGGCCCGAAGGGAACTCGTGATAGGGGGCGCAATGATATTCTGCTGTCTAAAAGCCACGACAAGGTCTCCACAAGTCAGGACGCCAATCCAACTAAATACTGCCGAAATGCGAGAATTCGTGCCCCCACGCACGTTCTAGGCGAGCGTTGGCGTCAGAAATACGTAAGACTGGTGGACTTTGAACAGGCAACGGGCAGCGACTATCGATAAAGTAAATCCCGCGATAGAAGTTACATCTCTTAGCCTCAGAGACTCATACCGGGCGTATCCGGTACGTCATCGCCATGGACCATTCCGGTAAGTCCATATCATATCGAACAGCCTTTACTACTGGAAACCCATCTTCCAGTACATGTCCGGAAATGGGACAATAGAAAACTGCGGTGCGTGAGCCTACTATAGTGTATCCCGGTATAGATTGGTGCTCAGGCAAAAGAGCTCTACGAGACAACGTCGACAGAGACAGGCGATCGTACGAGCGAGTAGGCATCACCTGCGGTGTTTGGACTATGTGAGGAGCATCAGGTCGTCTCTAAAGTATCGACTCTTCGTATTAGGCATCCACTCAAAATGAACCTTGCCCACGTCTCCTCCATCTCAGAGGATATGTCACGTCTGCCTACCTGAATGCCGACTGATTCGTCTACAACCACTAATACGGACGTAGTCTCCTCAAGAGTTACAGGTTAGATCCTTACCCATAATATCGGACAATCGTATCGGGTGGTGGTTAAGCGTCGGCGAGCTGTGGTTCAGTGCGATAGGGTTAACCCGCGTGTTCAACGCCCGGGCACAAGAAGTGAACTAGGCGTCTCGGTCCCGGAGGGTTGGATCCATTTACCATCGAGTACGAATTATGACTCCCTAAGTAATACCAAAAGGCCTAACCGGGCCAGGGCCCGTATCGCACCGACGCTCTGGGGTCCGCCTAGAGGTTGACCGCACGACAGGCCTCCTCCTATAGGCGGTTCCGCGTCGGACTACTATCGTCTGGTGTAAGACACTAAGCTCGAATCGACCACACGTAGATTATTTACGATCATGGTCGCTAGGGACCAGCTGTACAAGCTCGTAAACTTAACCTAGTCAGTATTTTGGACCTTTCAGGTGTACGCCGGAATTGAATTGTGGGCTTCAGCGAGCGATGTCCTTATTTAGCAATTCACGCACGGCGTACTCATATCGCTATAAGCGTGTCCGACCTAAGTGCGTTGGGCACTCCGTTCCTGAAAATGTTTTTCGCTGAATCTGGTGTAACCTGCGCGGCGGCATCTTATGAACATTAACCCGCGTCCAGGACGTAAGGATTCCGCACCCTAAGGAAACCGGGTCCGCTTATCAGTATCAGCTCATTGGAGGTTGAAACATTGCTTCCATCATGTCAAATGGTGCGGGAGCGTAGGCTCGTTCAAGGATCAAAGCCGCATGGTCGCCTGCTCTCTAGTTTCAAACTGTTAATAGGAAAACCGTGTACTATTAGAGGGTGGAATCCAAAGCCTTGTAGGGCATATAAGAGGGAAATTCTTTTTCCGGTGCTTAACCCAATGACTCCCTCCGGATAGCCTCACTAAATTCTGGCGATACAACTACTCGTTCGGGATTCTATTGCCTTCCGGATGGTTCCCTGTGCCTATAAGTTCGTTAACGGTGTACCTCGAACAGAATAAAAGTCCACCATGGAAATGGGATTCTCGGAGTGCTCCAGAATGATCTGTTAGCAGCTACGCCGCTGGTACTTCGTAATCCATTAAAGCGGTTTAGACTGCCAACTCCTCCGTGCGCAACAGATAGCCTCAACAATTTACGCCATCTGAGCGGACAGCATTTGATAAGGAATGTACATCACCGGGACTCCTTTTGTGGGAGTGCGGCACGGACGCGTTATGCCGAGTTCTCTAGCTACCCTGGCTAGAGAACCTAGGAGTGCACGTTCGTTTTGAACCCTAAACGTCCGATGCGACCCTTGAGTCGCAAACTGTGTAACATGCCGGCGGTGGGTAAAGTTATCTCTGGGATAGGTCTGAGCTCGCGAAAAAAGTCGCATCCGGGCATGGCTTGCCCAACTGTGGACCATTGCACAATAGCGAAACAGGCATGCGTTAAGTCACACCACAGACCTTGGAATTAGGGCGATGGCGTACCACACCTTATCGTGGAGCCCACCAAGAGAGCAAAAGTCATTAACGATCAATTTTGTAACAGATCTAATTGGATGGAG".count("A"))
print("CGCCAATGCGGCAAGGATATGCGAAGTCTGGACTAATTCGGCTGACGTGTCCCTGCTTAGTGGTCTTCCACACTTGCGGATTCAGCCGTAAGTGGCGTATACCTCGTGAGTGCACAAGGCAGATGTGACCTACCGGGGTTTTATCATTAGACTTTTGGGGTGAGCCGGATGACCGATCGAAGCCCGAGTGCAATTGTCTCTCTCGAACGAAGAACGGAGGAGAAAACGTGTGTGGGGGCCTACCGCCATGCACAAACTAGACTGTCACTAAAACCGTGAAGCTACGCTGGCCTCCAGGCGGTATAAACCTTTCGATGTTAACAAGCAAAGAACCAATTCGCGTGAGTAGGCGGGCGTATGGCCCCACGAGCCTTGCACTTGTTTTCGAAATGAATCAGGACGCCTAATTATCAGAGGGAGGAGAAATGAGGCCAGCCAGCGACACTGGTCAAGGTACGGGCGGTCGCTAGTGCCCAACCAAAGGTAAGTTATTGCGATGGTCCAAAAGAAGGCACGTGTGGATACACTCGTTTATGAACGTTTCTACGGCAGATCAGGCCGACCTTCGATAATAACAAGCGGCGGGACGCACGACGGGACTCGCTGTCGGTCAGCTATGGCCATTCCTCGTAGGAGCCGCATCTATCTCGAACTAATTGATAGTTTGGTGTAAGTCCCCTCAGGTGTCACGCAACGAAGATGCGCTGAAGATTACTTTCGCACGGGTCACACGGAAGGAGTACTGTAGGGCGGAAGAGCACCGACTGAGGCCACAATCTCGAAGTACTGTGCTTTCGCTCTAACTCGGCTTACCCGTCTACCTGTCGCCTCCCTAGATCCAAATTGAATCCGCCCCCCGTGCTCTGTGACCCAGGACGTATACGGCGTTTAGGTTGTCCACAGCTAAAAACCAGAAAGCGACCGAGTGTATTCGAAATTTCGGTGGACCTTTCAACCTATAGGTCTTGTCGAATTCACTTGGGAGAACAACGCATGAAATTTGACGGATCGTGCACGTGATATAATGGGACTGCTTAATTGCGCCCCATTTTGGGAGCGCATTTGAACGCAAGCTCTGGGTCCCGCTATATATTAAGAAAAGTATGAAACGTTGTTACCATATCCGCACACTGGGATAGGTACGCAGATTTGTACTTGTATGCGTAACTGATTTTTCCCCTGACGGAGGGTCCGTTCCTCTGAGCCCCCGTCGTGCGATCCTGGGTGGCCACGTCTAAGCTGTCGCGAGCGAACATTATTTATGTTTATCTGCCAGACGAGCTTTGCCTACTTTCGAGGGGATGAAATTTAATTAAGCGATTTGAATATAAGGGGGTTTCATATGCCTAGATTACCTAGTGCGTTTATACAACTATGGTGAATAGAGGAGCAGTCCGAGTTAGAGGACAAACACTTTCGCAGGTGGCAAGTCGCACTAGCGAGTTGATTACGGACCACGAGGTATATTCAGGACATCAATTTTCCTGGGGGGATCATCTCCTCTTACTGTAGCAGCTTTTTTCTCTCCCTGCGGATTCAAAGCCCTTGTTCTGTCGCTGCCATTTAAAGGGAAAGGACTCGGAAGAACAGGTTCAGAGATTGGCAAAGACGGTCTTCTGTGCACTTTGATCATTGTGGCTTGAGGCGGGAGACACGAACGGCGCTAGCGACTCTCATCTACCAGCCTATTATATCCGCTCCCCTGGTTGAGTAAATACCTAATAAGGACTTTTGTCAGATTGACTTTCTGCAAGGGCAGGGATGGCATAGGAGATATTCACTAATAGGATGAACGTCGAAGGAGTAAATTGTTTGGAGTAATATTTTAATTCTCCTCCGCATAAAAACGTGCCTGACTAATGCTGACTGGAAATGACGTCATGGGGTGACATCCTGACAAGTATTCGACAGACGCAGAATGGCGACGGCGCACTCAGATTTAGTCCTCTTCTTCCGAGTAAATACTCGTACACCGCAAAGATTGAGGGCATAGGTAAGCGTACAAAATCCGGTGTCATCGACCCAAGTAGAGACTACATGACGGGCCGTGAGGTGATCTGATCTTTGACTCTCCGTAAGGTGTCCCTAGGGGGTTCCCATGGTAACGGATTTGCGCTCAACCCGAAACTCGAACAACATCGAAATGAGTATAACGGTTAGAGGTTAGTGGGGGGTGCGAGTGCGGTGTTCCTACTGTACCCGAAGGATAGTCCTGTTTCATTCATATTGGAGATTACAGCCCCTAGAAGTGAGGGAACACGCCCGAGGCTTTCATGGCTACAGGTCGGGATGTCAGCCCCCTCTAAGGTTGGAAGCAATAGATCACCTATGTTAGATGGCAGCTGATTTCCACCTCCTGCCGAAGGTCCCATTATAGGCATCCCAAGGTGCAGTCGATACCCCAATTGTTCGCCTAGTGGTGGAGTGGCCATCTGTGGGGCATGTCATGAAGAACAGGCCACCTCGGCGACCCAACCTCCACTCAGTCGGTCCGCTGAAGTCTCGGAGCTCTAGTTGACGGAAGGCTTCGGGTTTCTCACCACCTGTCCGTAAGAGACCTGTATTGGTCGCACGCAGGAGGAAGACGGCTTACGATGTGTGGCTAATTCGCGTCCTCATGCCCAGCCATACTATGTTGTGACGCGATGACCTCAGCGGTTAATGCCTCTCCGCCAGTTGGATAGTTCGTTCTGGAAACCTGCAATACATCCTTTCGTGCTTGGCGTCTGATAAGAGTAAGGAACTTATTGAACGTTTACCCATAGCGGGCACTTCAAGTCTGGGCCCGAAGGGAACTCGTGATAGGGGGCGCAATGATATTCTGCTGTCTAAAAGCCACGACAAGGTCTCCACAAGTCAGGACGCCAATCCAACTAAATACTGCCGAAATGCGAGAATTCGTGCCCCCACGCACGTTCTAGGCGAGCGTTGGCGTCAGAAATACGTAAGACTGGTGGACTTTGAACAGGCAACGGGCAGCGACTATCGATAAAGTAAATCCCGCGATAGAAGTTACATCTCTTAGCCTCAGAGACTCATACCGGGCGTATCCGGTACGTCATCGCCATGGACCATTCCGGTAAGTCCATATCATATCGAACAGCCTTTACTACTGGAAACCCATCTTCCAGTACATGTCCGGAAATGGGACAATAGAAAACTGCGGTGCGTGAGCCTACTATAGTGTATCCCGGTATAGATTGGTGCTCAGGCAAAAGAGCTCTACGAGACAACGTCGACAGAGACAGGCGATCGTACGAGCGAGTAGGCATCACCTGCGGTGTTTGGACTATGTGAGGAGCATCAGGTCGTCTCTAAAGTATCGACTCTTCGTATTAGGCATCCACTCAAAATGAACCTTGCCCACGTCTCCTCCATCTCAGAGGATATGTCACGTCTGCCTACCTGAATGCCGACTGATTCGTCTACAACCACTAATACGGACGTAGTCTCCTCAAGAGTTACAGGTTAGATCCTTACCCATAATATCGGACAATCGTATCGGGTGGTGGTTAAGCGTCGGCGAGCTGTGGTTCAGTGCGATAGGGTTAACCCGCGTGTTCAACGCCCGGGCACAAGAAGTGAACTAGGCGTCTCGGTCCCGGAGGGTTGGATCCATTTACCATCGAGTACGAATTATGACTCCCTAAGTAATACCAAAAGGCCTAACCGGGCCAGGGCCCGTATCGCACCGACGCTCTGGGGTCCGCCTAGAGGTTGACCGCACGACAGGCCTCCTCCTATAGGCGGTTCCGCGTCGGACTACTATCGTCTGGTGTAAGACACTAAGCTCGAATCGACCACACGTAGATTATTTACGATCATGGTCGCTAGGGACCAGCTGTACAAGCTCGTAAACTTAACCTAGTCAGTATTTTGGACCTTTCAGGTGTACGCCGGAATTGAATTGTGGGCTTCAGCGAGCGATGTCCTTATTTAGCAATTCACGCACGGCGTACTCATATCGCTATAAGCGTGTCCGACCTAAGTGCGTTGGGCACTCCGTTCCTGAAAATGTTTTTCGCTGAATCTGGTGTAACCTGCGCGGCGGCATCTTATGAACATTAACCCGCGTCCAGGACGTAAGGATTCCGCACCCTAAGGAAACCGGGTCCGCTTATCAGTATCAGCTCATTGGAGGTTGAAACATTGCTTCCATCATGTCAAATGGTGCGGGAGCGTAGGCTCGTTCAAGGATCAAAGCCGCATGGTCGCCTGCTCTCTAGTTTCAAACTGTTAATAGGAAAACCGTGTACTATTAGAGGGTGGAATCCAAAGCCTTGTAGGGCATATAAGAGGGAAATTCTTTTTCCGGTGCTTAACCCAATGACTCCCTCCGGATAGCCTCACTAAATTCTGGCGATACAACTACTCGTTCGGGATTCTATTGCCTTCCGGATGGTTCCCTGTGCCTATAAGTTCGTTAACGGTGTACCTCGAACAGAATAAAAGTCCACCATGGAAATGGGATTCTCGGAGTGCTCCAGAATGATCTGTTAGCAGCTACGCCGCTGGTACTTCGTAATCCATTAAAGCGGTTTAGACTGCCAACTCCTCCGTGCGCAACAGATAGCCTCAACAATTTACGCCATCTGAGCGGACAGCATTTGATAAGGAATGTACATCACCGGGACTCCTTTTGTGGGAGTGCGGCACGGACGCGTTATGCCGAGTTCTCTAGCTACCCTGGCTAGAGAACCTAGGAGTGCACGTTCGTTTTGAACCCTAAACGTCCGATGCGACCCTTGAGTCGCAAACTGTGTAACATGCCGGCGGTGGGTAAAGTTATCTCTGGGATAGGTCTGAGCTCGCGAAAAAAGTCGCATCCGGGCATGGCTTGCCCAACTGTGGACCATTGCACAATAGCGAAACAGGCATGCGTTAAGTCACACCACAGACCTTGGAATTAGGGCGATGGCGTACCACACCTTATCGTGGAGCCCACCAAGAGAGCAAAAGTCATTAACGATCAATTTTGTAACAGATCTAATTGGATGGAG".count("AT"))
The output should be :
1259
304