To start FIJI on the computing room computers, click on the Fiji folder
on the Desktop, then select Fiji.app and click on ImageJ-win64.exe.
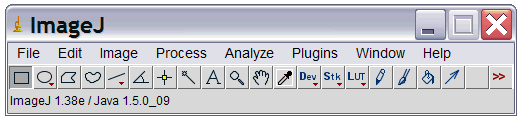
The core functionality in ImageJ is accessible via the menu bar shown below.
In the rest of this text, the notation
File > Open
indicates selecting first the “File” menu and then the “Open” Sub-menu/command.
File > Open or File > Import (depending on data type).
Open is generally used for 2D data sets (images) and Import for 3D data sets, as it allows opening image sequences, multi-layer tiffs, and films (avis).
Imagej has a macro system to allow the user to rapidly repeat a set of commands without having to execute each one individually.
For example, you may want to automate counting “blob”-like objects in images, which requires that you blur the image, then find maxima, and finally count the number of peaks.
Instead of running all three operations on each input image, the easiest way to create a macro is to let imagej record it when you perform the sequence of actions once.
First open an image that you will process. This operation will not be included in the macro at this point.
Next press Plugins > Macros... > Record ... to open up the macro
recording dialog (“Recorder”).
The recording has begun; any subsequent operations will appear in the Recorder dialog.
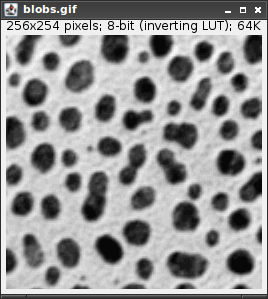
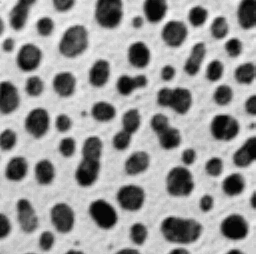
As an example after having opened Blobs from the samples (Hint: Use Ctrl+Shift+B), start the recorder.
Slightly broken ImageJ: use this link!
Next perform the following operations:
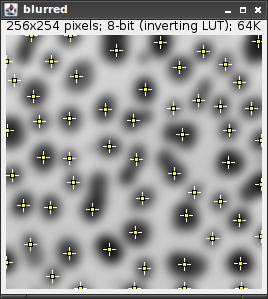
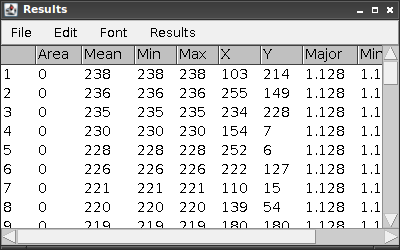
Image > Duplicate ...Process > Filters > Gaussian Blur...Process > Find Maxima...Analyze > MeasureThe Results window will show various measurements for the detected peaks (there should be 59!).
The Recorder window should show
run("Duplicate...", "title=blurred");

run("Gaussian Blur...", "sigma=5");

run("Find Maxima...", "noise=10 output=[Point Selection] light");

run("Measure");

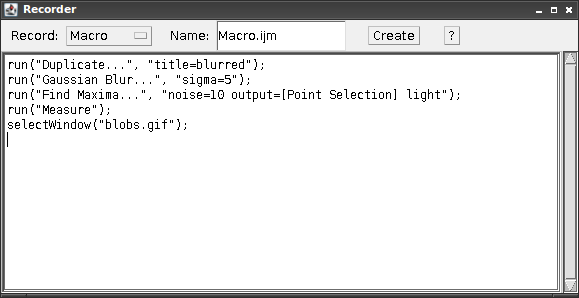
which summarizes the operations we performed.
This macro can be saved using the Create button to save the macro with the name specified in the “Name” field. This will open a save file dialog. Confirm that the filename is one that makes sense to you and a usual location is the imagej/Macros folder, then go ahead and save the Macro.
The macro can be applied on any loaded image by calling
Plugins > Macro > Run...
and finding and selecting the macro we just saved.
While we can not “record” standard Python script in the same way, Python scripting soon becomes second nature, meanining writing the equivalent script in Python can be (at least almost) as fast as performing a point-and-click series of operations in ImageJ.
Python version of simple blurring (view)
Use the above approach to apply the gaussian filter to the blobs data set over a short range of blur radii. At each scale, find the peak locations.
File > Open Samples > BlobsPlugins > Macros > Record...Process > Filters > Gaussian Blur ...
OkProcess > Find Maxima
Light backgroundOkAnalyze > MeasureNow either copy and paste the code recorded in the macro window multiple times to end up with, e.g.
run("Gaussian Blur...", "sigma=1");
run("Find Maxima...", "noise=10 output=[Point Selection] light");
run("Measure");
run("Gaussian Blur...", "sigma=2");
run("Find Maxima...", "noise=10 output=[Point Selection] light");
run("Measure");
run("Gaussian Blur...", "sigma=3");
run("Find Maxima...", "noise=10 output=[Point Selection] light");
run("Measure");
run("Gaussian Blur...", "sigma=4");
run("Find Maxima...", "noise=10 output=[Point Selection] light");
run("Measure");
Extension
If you’re happy with trying Macro scripting, you can try
the for loop syntax:
for(scale=1; scale <= 4; scale = scale + 1){
    run("Gaussian Blur...", "sigma="+scale);
    run("Find Maxima...", "noise=10 output=[Point Selection] light");
    run("Measure");
}